
 English | English
 German | Deutsch
 Indonesian | Indonesia
 Italian | Italiano
 Spanish | Español
 Turkish | Türkçe
How to generate product variants based on 3+ additional attributes and use exception rules
Applies to: 1C:Drive 1.5.1
Related modules: Sales, Production
Created on: July 1, 2023
Objectives
In 1C:Drive version 1.5.1, several enhancements to the product variant generator were introduced, making variant generation more powerful and flexible.
After completing this tutorial, you will:
- Learn to generate product variants based on 3 or more additional attributes.
- Know how variant exception rules work.
- Learn to generate product variants with exception rules.
Prerequisites
To complete this tutorial, it is recommended that you:
- Have a basic understanding of product variants in 1C:Drive. To learn about product variants, read this article.
Case description
Batik Production Company is a company specializing in shirt manufacturing for customers worldwide. They produce shirts of different sizes and colors. They also have a different shirt collection for each year.
With 4 available colors and 4 sizes, manually creating all possible shirt variants for each regional market in 1C:Drive takes a lot of time and effort, and has to be repeated every year. Let’s see how we can automate this process by using 1C:Drive variant generator.
Consider a case where the company receives two orders: 1 000 white XL-size shirts for a European customer (retail price €50 per shirt), and 2 500 red S-size shirts for an Asian customer (retail price €44 per shirt). Only the 2023 collection is currently in stock.
Key steps
During the tutorial, you will go through the following steps:
Set up 1C:Drive
Let’s start with making several quick changes to 1C:Drive default settings. These changes are needed to run the tutorial.
- Enable multi-business accounting.
This allows you to create additional businesses. You need it to register Batik Production Company.
To do this:
- Go to Settings.
- Under Accounting settings, click Company.
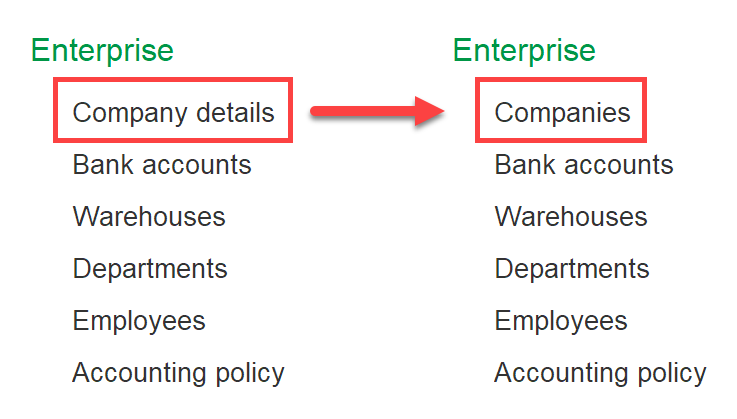
- Select the Use multi-business accounting checkbox.
Now, when you go to Company, you can see the Companies link instead of Company details. Follow this link to register additional companies for your business.
This step is optional. You can skip it and complete the tutorial using the default company if you want.
- Enable inventory accounting by variants.
You need it to create variants for the shirts manufactured by Batik Production Company.
To do this:
- Go to Settings.
- Under Accounting settings, click Purchases/Warehouse.
- Select the Inventory accounting by variants checkbox.
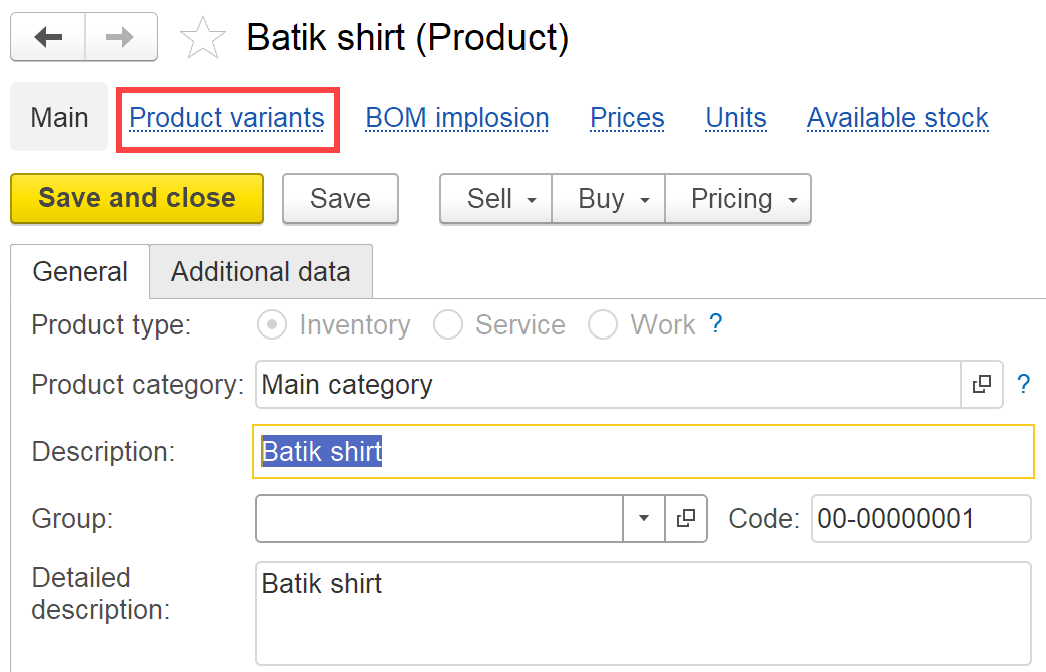
Now, when you open a product card, you can see the Product variants link on the link bar. Follow this link to create and manage variants for your products.
Fill initial data
The next step is to fill 1C:Drive with the initial data you will need during the tutorial.
- Create a company named Batik production company.
To do this, go to Company > Companies and click Create. Then, enter the company details as on the screenshot below and click Save and close.
This step is optional. You can skip it and complete the tutorial using the default company if you want.

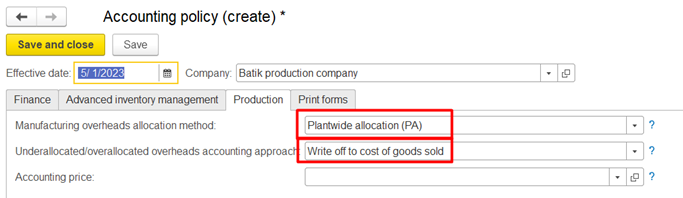
- Create an accounting policy for Batik production company.
To do this, go to Company > Accounting policy and click Create. Then, enter the details as on the screenshots below and click Save and close.
This step is only required if you created Batik production company. If you choose to use the default 1C:Drive company instead, skip this step.

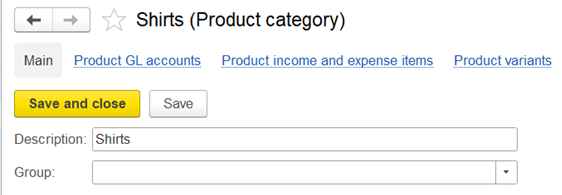
- Create a product category named Shirts.
You will use it to store all additional attributes describing the product variants.
To do this, go to Company > All catalogs > Product categories and click Create. Then, enter the details as on the screenshot below and click Save and close.
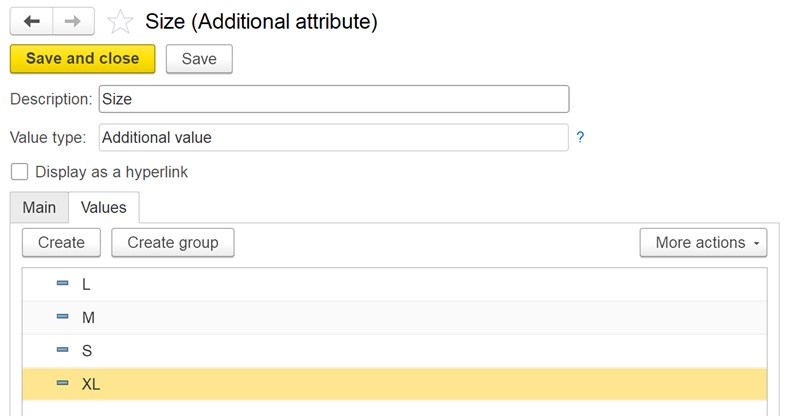
- Create additional attributes for the Shirts product category.
1C:Drive will parse all possible combinations of the attribute values and generate a product variant for each combination (for example, “Black / M / Asia / 2022” or “Red / XL / Europe / 2023”).
To do this, open the Shirts product category and click Configure variant attributes set. Then, click Create, enter the attribute details and create values in accordance with the table and screenshot below. Repeat for each additional attribute. When done, click Save and close.
Additional attribute | Value type | Values |
|---|---|---|
Color | Additional value |
|
Size | Additional value |
|
Region | Additional value |
|
Collection | Number |
- Create a variant exception rule.
Some combinations of attribute values may not be desirable. You need to specify these combinations so that they will be prohibited from generating variants. In this case, Batik production company does not produce XL-size shirts for the Asian market, so you need to prohibit the “XL / Asia” combination.
To do this, open the Shirts product category and click Configure variant exception. Then, click Create, enter the details as on the screenshot below, and click Save and close.
You have just created a variant exception rule. Please note that variant exception rules are a new feature that was introduced in 1C:Drive 1.5.1.

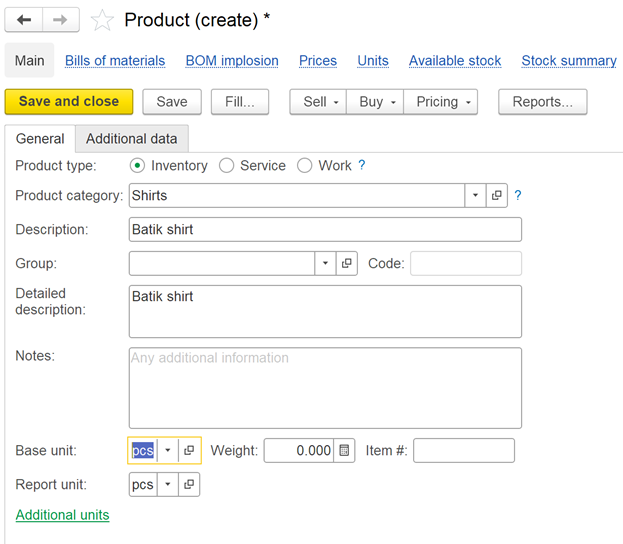
- Create the Batik shirt product.
To do this, go to Production > Products and click Create. Then, enter the details as on the screenshot below and click Save and close.
- Create two customers interested in the batik shirts:
- Giant Mall
- Fashion Boutique
To do this, go to Sales > Customers and click Create. Then, enter the customer’s name and click Save and close. Repeat for the remaining customer.
Generate variants
Now that all the data is in place, let’s generate the product variants representing all kinds of shirts that Batik Production Company offers to their customers.
It is possible to generate all variants for both customers at once, but we shall do it separately, for demonstration purposes.
Generate variants for European customer
Open the Batik shirt product card, click Product variants link, and click Generate. This opens the variant generation window.
First, let’s refresh the information that can help us to narrow down the variant list:
- The customer is from Europe and, therefore, is only interested in European product variants.
- Only the 2023 collection is in stock.
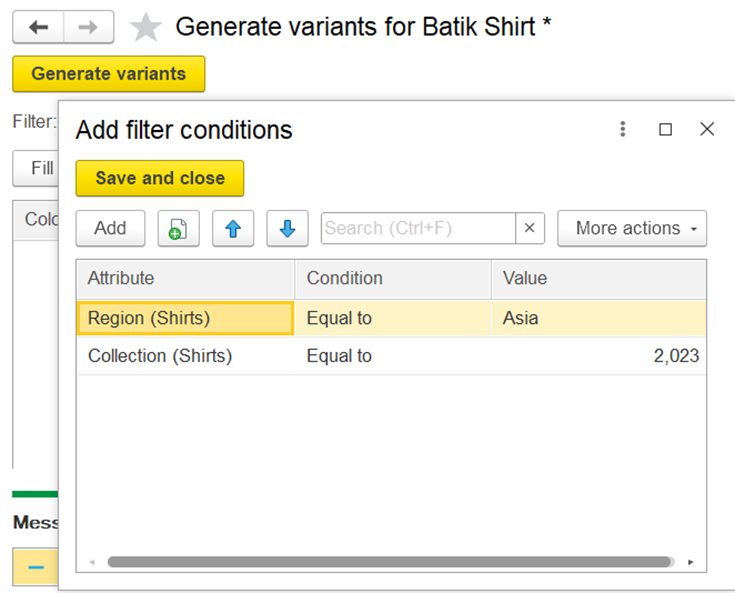
To reflect these facts, set filters as on the screenshot below:
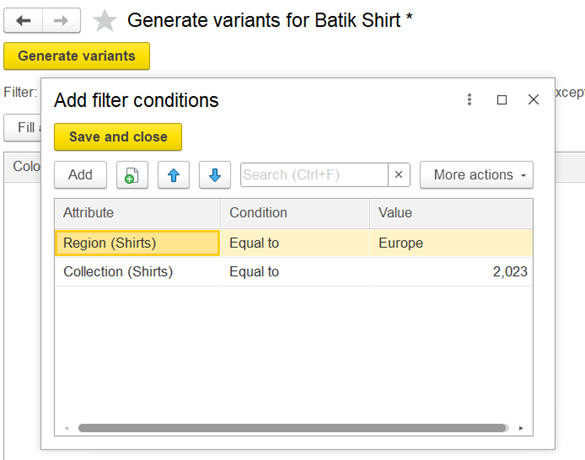
Next, specify the variant exception rule you have created earlier.
Click Fill attribute values. This displays a list of all possible combinations of additional attribute values, limited by filters and exceptions rules.
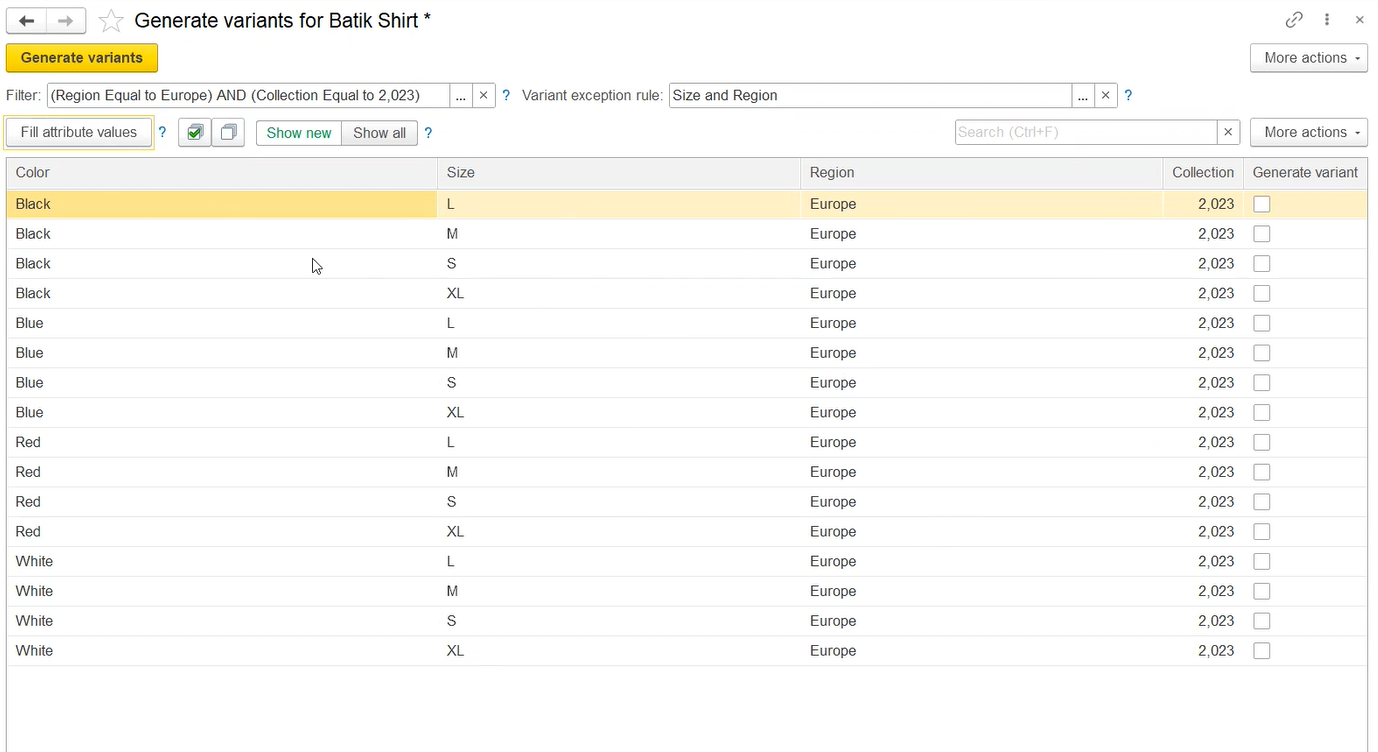
As you can see, 16 possible attribute combinations are found. Is this right? Let’s cross-check. We have shirts of 4 colors, 4 sizes, 1 region (Europe), and 1 annual collection (2023). The variant exception rule does not affect the result, as it only applies to the Asian region. 4×4×1×1 = 16. The result checks out.
Now you need to choose which combinations to use for product variants. This is easy, we want all of them. Select checkboxes for all lines and click Generate variants.
You have just generated a set of product variants based on 4 additional attributes. Please note that variant generation from 3+ additional attributes is a new feature that was introduced in 1C:Drive 1.5.1.
16 product variants are generated, as expected:

Generate variants for Asian customer
Before generating the second set of variants, you need to modify the filters to reflect the fact that the second customer is from Asia:
Click Fill attribute values.

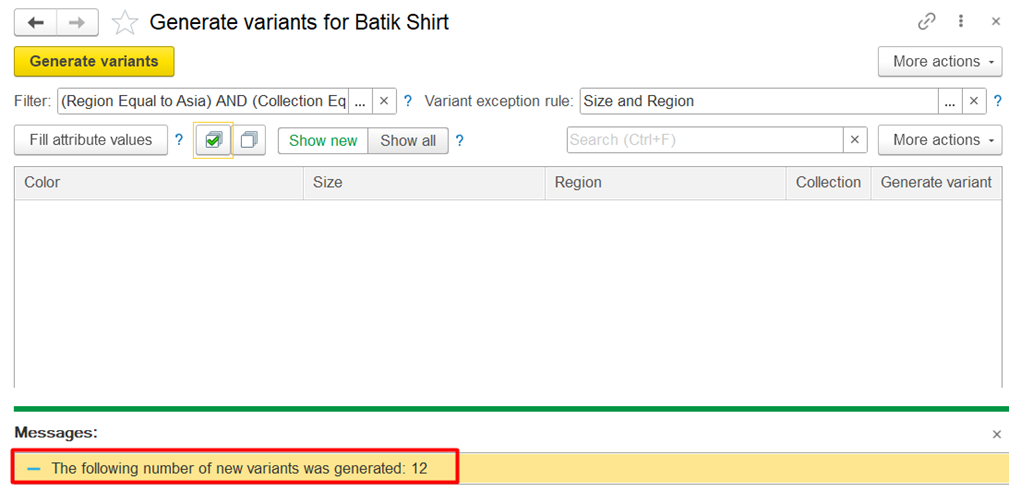
Now, only 12 possible attribute combinations are found. Let’s cross-check this number as well. We have shirts of 4 colors, 3 sizes (no XL for Asia), 1 region (Asia), and 1 annual collection (2023). 4×3×1×1 = 12. The result checks out.
Select checkboxes for all lines and click Generate variants.
12 product variants are generated, as expected:
Create sales orders
After generating the product variants for both regions, let’s register the sales orders that Batik Production Company received from Giant mall and Fashion boutique.
To do this, go to Sales > Sales orders and click Create. Then, enter the order details as on the screenshots below and click Save and close.


Generate reports
As a final step, you can optionally use the Sales order statement report to review the sales orders you’ve just created.
To do this, go to Sales > Reports > Sales order statement.
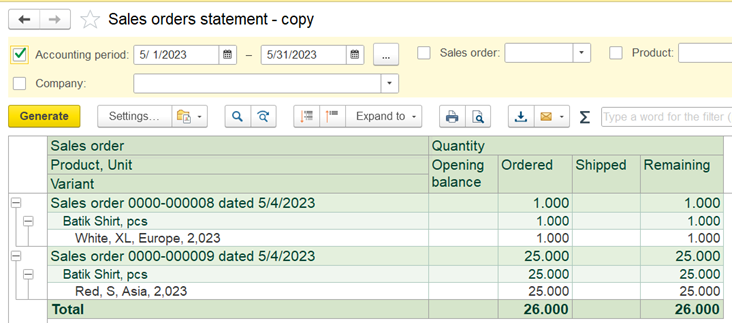
However, by default this report does not differentiate between product variants, so you need to add "Variant" column manually. That's how you do it:

Now, generate the report.
As you can see on the screenshot below, both sales orders are correctly registered.
This concludes the tutorial. Thank you for your time!